In this blog post, we are going to look into how to use the External Tool in Visual Studio 2019. Using this feature, the user can configure and call external tools right from the Visual Studio Tools menu. Whenever the user configures a new external tool, its title appears right in the Tools menu.
Visual Studio 2019 is one of the best developer friendly Integrated Development Environment (IDE). The IDE has tons of features that help to ease the development process. These features can be further customized or new features can be added using Visual Studio Extensions.
Visual Studio 2019 has support for a huge list of programming languages and application frameworks. Applications ranging from the Mobile app, Windows app, Web App, Cloud Services, IoT apps, and many more can be built using this single IDE and the best of all the fully-featured Community Edition can be used without any license fee. [Download here]
How to add a new external tool in Visual Studio 2019
In order to add any external tool to the Visual Studio Tools menu, the user needs to add the reference of the external tool in the “External Tools” dialog first. The dialog can be opened choosing Tools > External Tools menu item. Before adding any reference to an external tool, let us first understand the “External Tools” dialog setup.
The External Tools Dialog
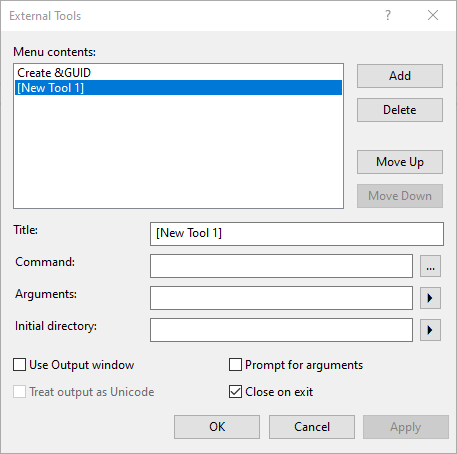
When the user clicks in Add button, the dialog will have the following details as given in the snapshot below, the details of each configuration in the dialog is given below:

Title: This is the title of the command reference, that will be displayed as a menu item in the Tools menu.
Command: Here the complete path of the tool (command or program) you want to configure needs to be given. The user can browse and select the tools path.
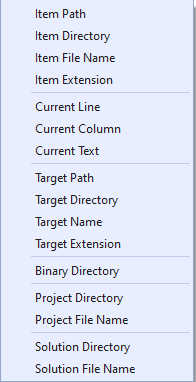
Arguments: Here the user can select an argument from the predefined list of arguments that the tool might require in order to execute. The list of predefined arguments is given below, the complete details of them can be found at the MSDN link.

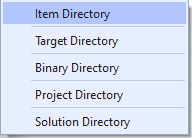
Initial Directory: This is the directory where the command should look for the argument supplied, suppose the command requires the name of the file as an input, the value provided in the initial directory is where the command should look for the file first. The value for the initial directory is also predefined.

Use Output Window: The output of the command when execute from the Tools menu will be displayed in the Visual Studio Output Window.
Prompt for Argument: If you want supply argument while executing the tool, then check this option.
Configure VS Code to open the selected file in Visual Studio
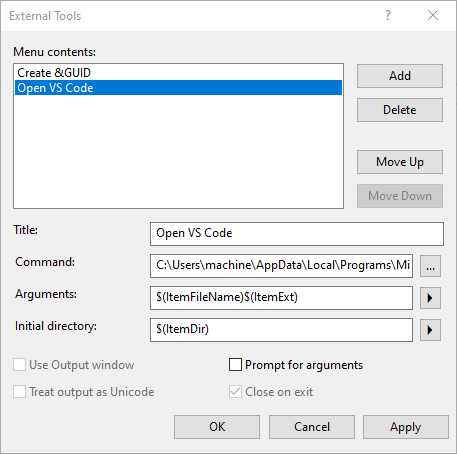
Let us assume we want to open the Visual Studio Code (VS Code) directly from Visual Studio with the selected file, so we provide the following details in the External Tools dialog.
Another case, you might consider is to open notepad++ for instance. Here the command path will only change and will point to the installation path of the notepad++.
For now let us consider the first case of Opening Visual Studio Code.

On saving the configuration, this will add a new menu item “Open VS Code” in the Tool menu and on selecting the menu item, this will open the currently selected file in Visual Studio in Visual Studio Code as given in the snapshot below:
The external tools feature is a great way to create a simple clickable solution for some repetitive tasks by referring to executable commands.
I hope you find this post on how to use the external tool in Visual Studio 2019 helpful, thanks for visiting, Cheers!!!
[Further Readings: Top Features of Visual Studio 2019 Community Edition | Basic CRUD operations in Blazor using SQLite as the database | How to consume REST API in Blazor Application | Blazor Lifecycle Methods | A Simple way to Call Javascript in Blazor Application | Creational Design Patterns | Builder Design Pattern in C# | Prototype Design Pattern in C# | Top 5 Blazor Component Libraries | Abstract Factory Design Pattern in C# | Factory Method Pattern in C# | Singleton Design Pattern in C# | Introduction to Design Patterns | Microsoft C# Version History | Microsoft .NET Core Versions History | Microsoft .NET Framework Version History | Introduction to WPF in .NET Core ]