In this blog post, we will discuss how to install Windows Terminal application on a Windows 10 machine and will learn about its brief overview, main features, and important configuration files.
What is a Windows Terminal?
“Windows Terminal is a modern terminal application for users of command-line tools and shells like Command Prompt, PowerShell, and Windows Subsystem for Linux (WSL). Its main features include multiple tabs, panes, Unicode and UTF-8 character support, a GPU accelerated text rendering engine, and the ability to create your own themes and customize text, colors, backgrounds, and shortcut key bindings“. [source: Microsoft Docs]
Features of Windows Terminal
Windows Terminal is packed with lots of features, and the user can customize a variety of functionality to improve day to day workflows. Below given are some of the top features. The details of all the available features are well documented and can be found at Microsoft site
Customization
This is one of the best features that any user would like. The user can customize backgrounds, color schemes, add background images, custom fonts as well as define its own key bindings (shortcuts). An individual profile can be also customized as per need.
Dynamic Profile
The Terminal automatically creates multiple profiles for multiple versions of PowerShell or WSL (Windows Subsystem for Linux) installed on the system. Each of these profiles can be customized individually.
Tab Based UI
The Terminal offers a tab-based user interface. The user can work with multiple profiles in a single instance of Terminal by opening multiple sessions of all the available profile options.

Panes
The user can also run multiple command-line shells in a single tab side-by-side and work accordingly.

GPU Rendering
The Terminal uses GPU to render text, providing greater performance than its predecessor command-line interface. The support for Unicode and UTF-8 character is also rendered by the GPU, hence providing support for emojis and new fonts.
Steps to Install Windows Terminal
Install from Windows Store
The Windows Terminal can be installed directly from the Microsoft Store. Open Microsoft Store app from the Start menu and search for Windows Terminal and select Windows Terminal as shown or you can be opened directly using the link: https://www.microsoft.com/en-us/p/windows-terminal/9n0dx20hk701

The only requirement is the operating system’s minimum version number. If we open the store and search for Windows Terminal and look for the minimum requirement, it says “Windows 10 version 18362.0 or higher“. If you have this version or above you are good to go.

Verify OS Version
Check the version of your operating system by opening the “winver” application. Press Windows + R to open the Run dialog and type winver in it and click OK button.
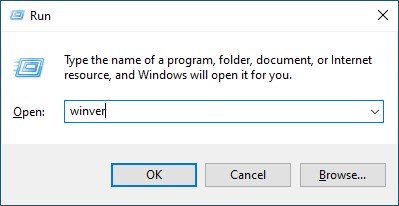
This will open a dialog displaying the current version on Windows on your machine.
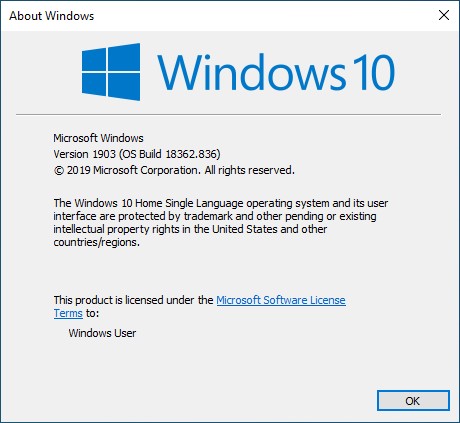
If you have the minimum required version or above you are good to go, else you need to update your Windows.
Install Windows Terminal
If you meet the minimum OS version requirement then click on the install button in the Windows Store App and this will install the application on your machine.

Run Windows Terminal
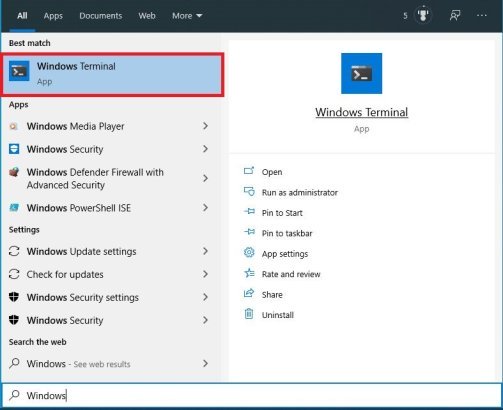
On Start Menu search for Windows Terminal and open the application.
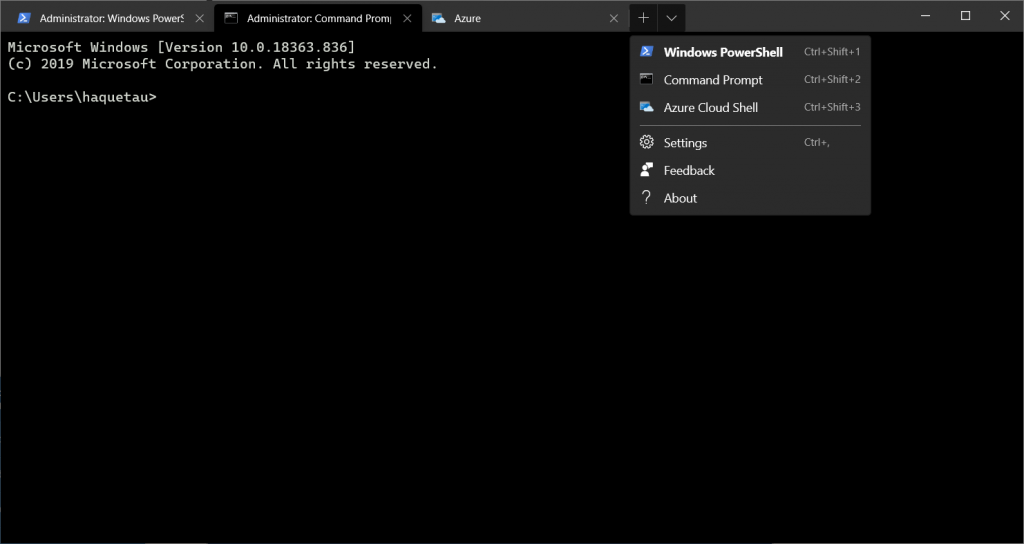
Once the application is up and running, you will notice a completely new user interface compare to the previous CMD shell or PowerShell applications. The terminal application now has tabs to allow multiple sessions as well as multiple shells in the same session.
The application will open the PowerShell profile by default (can be different on your machine) and all the available OS supported shell will be available in the drop-down combo box.
The Configuration Files
The best feature of Windows Terminal is the ability to customize it. The user can customize, its text color, cursor shape, background color, background image, opacity, icon settings, etc. The user can have multiple customized profiles and can have global settings to apply to all the available profiles as well. All these settings are stored in different JSON files. Let us look into these files and have a brief overview of them.
settings.json
The settings.json file as the name suggests contains settings for the terminal application. A few of the important settings like what should be your default profile, color scheme, key bindings, etc can be found here.
The setting.json file can be opened by clicking the Settings menu item or the file can be found at the Windows App packages location at the following: %userprofile%\appdata\Local\Packages\Microsoft.Windowsterminal_8wekyb3d8bbwe
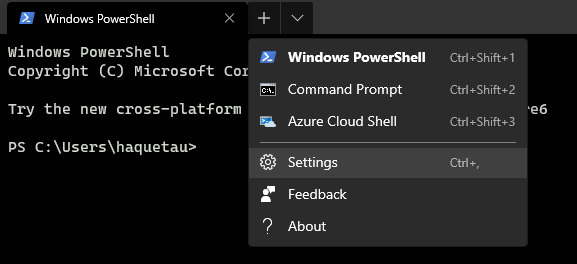
The sample settings.json is given below, your settings.json might look a bit different depending upon your profiles, plus I have removed all the comments from the file.
{
    "$schema": "https://aka.ms/terminal-profiles-schema",
    "defaultProfile": "{61c54bbd-c2c6-5271-96e7-009a87ff44bf}",
    "copyOnSelect": false,
    "copyFormatting": false,
    "profiles":
    {
        "defaults":
        {
 	    "colorScheme": "Tango Dark"
        },
        "list":
        [
            {
                "guid": "{61c54bbd-c2c6-5271-96e7-009a87ff44bf}",
                "name": "Windows PowerShell",
                "commandline": "powershell.exe",
                "hidden": false
            },
            {
                "guid": "{0caa0dad-35be-5f56-a8ff-afceeeaa6101}",
                "name": "Command Prompt",
                "commandline": "cmd.exe",
                "hidden": false
            },
            {
                "guid": "{b453ae62-4e3d-5e58-b989-0a998ec441b8}",
                "hidden": false,
                "name": "Azure Cloud Shell",
                "source": "Windows.Terminal.Azure"
            }
        ]
    },
    "schemes": [],
    "keybindings":
    [
        { "command": {"action": "copy", "singleLine": false }, "keys": "ctrl+c" },
        { "command": "paste", "keys": "ctrl+v" },
        { "command": "find", "keys": "ctrl+shift+f" },
        { "command": { "action": "splitPane", "split": "auto", "splitMode": "duplicate" }, "keys": "alt+shift+d" }
    ]
}
defaults.json
The defaults.json file contains all the default configuration values for the terminal. This file can be used for reference, as it is an auto-generated file and contains all complete default configuration of the terminal application.
Here in this file, we can see, the profiles, key-bindings, or shortcuts at application-level, tab management, pane-management, visual-adjustment, default color-schemes, etc. To open the default.json file hold the alt key while opening settings.json file as mentioned above.
// THIS IS AN AUTO-GENERATED FILE! Changes to this file will be ignored.
{
    "defaultProfile": "{61c54bbd-c2c6-5271-96e7-009a87ff44bf}",

    // Launch Settings
    "initialCols": 120,
    "initialRows": 30,
    "launchMode": "default",

    // Selection
    "copyOnSelect": false,
    "copyFormatting": true,
    "wordDelimiters": " /\\()\"'-.,:;<>~!@#$%^&*|+=[]{}~?\u2502",

    // Tab UI
    "alwaysShowTabs": true,
    "showTabsInTitlebar": true,
    "showTerminalTitleInTitlebar": true,
    "tabWidthMode": "equal",

    // Miscellaneous
    "confirmCloseAllTabs": true,
    "theme": "system",
    "rowsToScroll": "system",
    "snapToGridOnResize": true,

    "profiles":
    [
        {
            "guid": "{61c54bbd-c2c6-5271-96e7-009a87ff44bf}",
            "name": "Windows PowerShell",
            "commandline": "powershell.exe",
            "icon": "ms-appx:///ProfileIcons/{61c54bbd-c2c6-5271-96e7-009a87ff44bf}.png",
            "colorScheme": "Campbell",
            "antialiasingMode": "grayscale",
            "closeOnExit": "graceful",
            "cursorShape": "bar",
            "fontFace": "Cascadia Mono",
            "fontSize": 12,
            "hidden": false,
            "historySize": 9001,
            "padding": "8, 8, 8, 8",
            "snapOnInput": true,
            "startingDirectory": "%USERPROFILE%",
            "useAcrylic": false
        },
        {
            "guid": "{0caa0dad-35be-5f56-a8ff-afceeeaa6101}",
            "name": "Command Prompt",
            "commandline": "cmd.exe",
            "icon": "ms-appx:///ProfileIcons/{0caa0dad-35be-5f56-a8ff-afceeeaa6101}.png",
            "colorScheme": "Campbell",
            "antialiasingMode": "grayscale",
            "closeOnExit": "graceful",
            "cursorShape": "bar",
            "fontFace": "Cascadia Mono",
            "fontSize": 12,
            "hidden": false,
            "historySize": 9001,
            "padding": "8, 8, 8, 8",
            "snapOnInput": true,
            "startingDirectory": "%USERPROFILE%",
            "useAcrylic": false
        }
    ],
    "schemes":
    [
        // A profile can override the following color scheme values:
        //   - "foreground"
        //   - "background"
        //   - "cursorColor"
        {
            "name": "Campbell",
            "foreground": "#CCCCCC",
            "background": "#0C0C0C",
            "cursorColor": "#FFFFFF",
            "black": "#0C0C0C",
            "red": "#C50F1F",
            "green": "#13A10E",
            "yellow": "#C19C00",
            "blue": "#0037DA",
            "purple": "#881798",
            "cyan": "#3A96DD",
            "white": "#CCCCCC",
            "brightBlack": "#767676",
            "brightRed": "#E74856",
            "brightGreen": "#16C60C",
            "brightYellow": "#F9F1A5",
            "brightBlue": "#3B78FF",
            "brightPurple": "#B4009E",
            "brightCyan": "#61D6D6",
            "brightWhite": "#F2F2F2"
        },
        {
            "name": "Campbell Powershell",
            "foreground": "#CCCCCC",
            "background": "#012456",
            "cursorColor": "#FFFFFF",
            "black": "#0C0C0C",
            "red": "#C50F1F",
            "green": "#13A10E",
            "yellow": "#C19C00",
            "blue": "#0037DA",
            "purple": "#881798",
            "cyan": "#3A96DD",
            "white": "#CCCCCC",
            "brightBlack": "#767676",
            "brightRed": "#E74856",
            "brightGreen": "#16C60C",
            "brightYellow": "#F9F1A5",
            "brightBlue": "#3B78FF",
            "brightPurple": "#B4009E",
            "brightCyan": "#61D6D6",
            "brightWhite": "#F2F2F2"
        },
        {
            "name": "Vintage",
            "foreground": "#C0C0C0",
            "background": "#000000",
            "cursorColor": "#FFFFFF",
            "black": "#000000",
            "red": "#800000",
            "green": "#008000",
            "yellow": "#808000",
            "blue": "#000080",
            "purple": "#800080",
            "cyan": "#008080",
            "white": "#C0C0C0",
            "brightBlack": "#808080",
            "brightRed": "#FF0000",
            "brightGreen": "#00FF00",
            "brightYellow": "#FFFF00",
            "brightBlue": "#0000FF",
            "brightPurple": "#FF00FF",
            "brightCyan": "#00FFFF",
            "brightWhite": "#FFFFFF"
        },
        {
            "name": "One Half Dark",
            "foreground": "#DCDFE4",
            "background": "#282C34",
            "cursorColor": "#FFFFFF",
            "black": "#282C34",
            "red": "#E06C75",
            "green": "#98C379",
            "yellow": "#E5C07B",
            "blue": "#61AFEF",
            "purple": "#C678DD",
            "cyan": "#56B6C2",
            "white": "#DCDFE4",
            "brightBlack": "#5A6374",
            "brightRed": "#E06C75",
            "brightGreen": "#98C379",
            "brightYellow": "#E5C07B",
            "brightBlue": "#61AFEF",
            "brightPurple": "#C678DD",
            "brightCyan": "#56B6C2",
            "brightWhite": "#DCDFE4"
        },
        {
            "name": "One Half Light",
            "foreground": "#383A42",
            "background": "#FAFAFA",
            "cursorColor": "#4F525D",
            "black": "#383A42",
            "red": "#E45649",
            "green": "#50A14F",
            "yellow": "#C18301",
            "blue": "#0184BC",
            "purple": "#A626A4",
            "cyan": "#0997B3",
            "white": "#FAFAFA",
            "brightBlack": "#4F525D",
            "brightRed": "#DF6C75",
            "brightGreen": "#98C379",
            "brightYellow": "#E4C07A",
            "brightBlue": "#61AFEF",
            "brightPurple": "#C577DD",
            "brightCyan": "#56B5C1",
            "brightWhite": "#FFFFFF"
        },
        {
            "name": "Solarized Dark",
            "foreground": "#839496",
            "background": "#002B36",
            "cursorColor": "#FFFFFF",
            "black": "#073642",
            "red": "#DC322F",
            "green": "#859900",
            "yellow": "#B58900",
            "blue": "#268BD2",
            "purple": "#D33682",
            "cyan": "#2AA198",
            "white": "#EEE8D5",
            "brightBlack": "#002B36",
            "brightRed": "#CB4B16",
            "brightGreen": "#586E75",
            "brightYellow": "#657B83",
            "brightBlue": "#839496",
            "brightPurple": "#6C71C4",
            "brightCyan": "#93A1A1",
            "brightWhite": "#FDF6E3"
        },
        {
            "name": "Solarized Light",
            "foreground": "#657B83",
            "background": "#FDF6E3",
            "cursorColor": "#002B36",
            "black": "#073642",
            "red": "#DC322F",
            "green": "#859900",
            "yellow": "#B58900",
            "blue": "#268BD2",
            "purple": "#D33682",
            "cyan": "#2AA198",
            "white": "#EEE8D5",
            "brightBlack": "#002B36",
            "brightRed": "#CB4B16",
            "brightGreen": "#586E75",
            "brightYellow": "#657B83",
            "brightBlue": "#839496",
            "brightPurple": "#6C71C4",
            "brightCyan": "#93A1A1",
            "brightWhite": "#FDF6E3"
        },
        {
            "name": "Tango Dark",
            "foreground": "#D3D7CF",
            "background": "#000000",
            "cursorColor": "#FFFFFF",
            "black": "#000000",
            "red": "#CC0000",
            "green": "#4E9A06",
            "yellow": "#C4A000",
            "blue": "#3465A4",
            "purple": "#75507B",
            "cyan": "#06989A",
            "white": "#D3D7CF",
            "brightBlack": "#555753",
            "brightRed": "#EF2929",
            "brightGreen": "#8AE234",
            "brightYellow": "#FCE94F",
            "brightBlue": "#729FCF",
            "brightPurple": "#AD7FA8",
            "brightCyan": "#34E2E2",
            "brightWhite": "#EEEEEC"
        },
        {
            "name": "Tango Light",
            "foreground": "#555753",
            "background": "#FFFFFF",
            "cursorColor": "#000000",
            "black": "#000000",
            "red": "#CC0000",
            "green": "#4E9A06",
            "yellow": "#C4A000",
            "blue": "#3465A4",
            "purple": "#75507B",
            "cyan": "#06989A",
            "white": "#D3D7CF",
            "brightBlack": "#555753",
            "brightRed": "#EF2929",
            "brightGreen": "#8AE234",
            "brightYellow": "#FCE94F",
            "brightBlue": "#729FCF",
            "brightPurple": "#AD7FA8",
            "brightCyan": "#34E2E2",
            "brightWhite": "#EEEEEC"
        }
    ],
    "keybindings":
    [
        // Application-level Keys
        { "command": "closeWindow", "keys": "alt+f4" },
        { "command": "toggleFullscreen", "keys": "alt+enter" },
        { "command": "toggleFullscreen", "keys": "f11" },
        { "command": "openNewTabDropdown", "keys": "ctrl+shift+space" },
        { "command": "openSettings", "keys": "ctrl+," },
        { "command": "find", "keys": "ctrl+shift+f" },

        // Tab Management
        // "command": "closeTab" is unbound by default.
        //   The closeTab command closes a tab without confirmation, even if it has multiple panes.
        { "command": "newTab", "keys": "ctrl+shift+t" },
        { "command": { "action": "newTab", "index": 0 }, "keys": "ctrl+shift+1" },
        { "command": { "action": "newTab", "index": 1 }, "keys": "ctrl+shift+2" },
        { "command": { "action": "newTab", "index": 2 }, "keys": "ctrl+shift+3" },
        { "command": { "action": "newTab", "index": 3 }, "keys": "ctrl+shift+4" },
        { "command": { "action": "newTab", "index": 4 }, "keys": "ctrl+shift+5" },
        { "command": { "action": "newTab", "index": 5 }, "keys": "ctrl+shift+6" },
        { "command": { "action": "newTab", "index": 6 }, "keys": "ctrl+shift+7" },
        { "command": { "action": "newTab", "index": 7 }, "keys": "ctrl+shift+8" },
        { "command": { "action": "newTab", "index": 8 }, "keys": "ctrl+shift+9" },
        { "command": "duplicateTab", "keys": "ctrl+shift+d" },
        { "command": "nextTab", "keys": "ctrl+tab" },
        { "command": "prevTab", "keys": "ctrl+shift+tab" },
        { "command": { "action": "switchToTab", "index": 0 }, "keys": "ctrl+alt+1" },
        { "command": { "action": "switchToTab", "index": 1 }, "keys": "ctrl+alt+2" },
        { "command": { "action": "switchToTab", "index": 2 }, "keys": "ctrl+alt+3" },
        { "command": { "action": "switchToTab", "index": 3 }, "keys": "ctrl+alt+4" },
        { "command": { "action": "switchToTab", "index": 4 }, "keys": "ctrl+alt+5" },
        { "command": { "action": "switchToTab", "index": 5 }, "keys": "ctrl+alt+6" },
        { "command": { "action": "switchToTab", "index": 6 }, "keys": "ctrl+alt+7" },
        { "command": { "action": "switchToTab", "index": 7 }, "keys": "ctrl+alt+8" },
        { "command": { "action": "switchToTab", "index": 8 }, "keys": "ctrl+alt+9" },

        // Pane Management
        { "command": "closePane", "keys": "ctrl+shift+w" },
        { "command": { "action": "splitPane", "split": "horizontal" }, "keys": "alt+shift+-" },
        { "command": { "action": "splitPane", "split": "vertical" }, "keys": "alt+shift+plus" },
        { "command": { "action": "resizePane", "direction": "down" }, "keys": "alt+shift+down" },
        { "command": { "action": "resizePane", "direction": "left" }, "keys": "alt+shift+left" },
        { "command": { "action": "resizePane", "direction": "right" }, "keys": "alt+shift+right" },
        { "command": { "action": "resizePane", "direction": "up" }, "keys": "alt+shift+up" },
        { "command": { "action": "moveFocus", "direction": "down" }, "keys": "alt+down" },
        { "command": { "action": "moveFocus", "direction": "left" }, "keys": "alt+left" },
        { "command": { "action": "moveFocus", "direction": "right" }, "keys": "alt+right" },
        { "command": { "action": "moveFocus", "direction": "up" }, "keys": "alt+up" },

        // Clipboard Integration
        { "command": { "action": "copy", "singleLine": false }, "keys": "ctrl+shift+c" },
        { "command": { "action": "copy", "singleLine": false }, "keys": "ctrl+insert" },
        { "command": "paste", "keys": "ctrl+shift+v" },
        { "command": "paste", "keys": "shift+insert" },

        // Scrollback
        { "command": "scrollDown", "keys": "ctrl+shift+down" },
        { "command": "scrollDownPage", "keys": "ctrl+shift+pgdn" },
        { "command": "scrollUp", "keys": "ctrl+shift+up" },
        { "command": "scrollUpPage", "keys": "ctrl+shift+pgup" },

        // Visual Adjustments
        { "command": { "action": "adjustFontSize", "delta": 1 }, "keys": "ctrl+=" },
        { " command": { "action": "adjustFontSize", "delta": -1 }, "keys": "ctrl+-" },
        { "command": "resetFontSize", "keys": "ctrl+0" }
    ]
}
This concludes the post, I hope this post on How to install Window Terminal is helpful to you, thanks for visiting, Cheers!!!
[Further Readings: Important Debugging Shortcuts of Visual Studio 2019 | How to publish a Blazor Server Application to IIS | Top 7 Visual Studio 2019 extensions for Web Projects | The difference in Blazor Server and WebAssembly Application | Exploring Blazor WebAssembly App Project Structure | Top 10 Productivity Tips and Tricks in Visual Studio 2019 | CRUD Operations in WPF using EntityFrameworkCore and SQLite | How to implement Dependency Injection in WPF | How to use External Tool in Visual Studio 2019 | Top Features of Visual Studio 2019 Community Edition | Basic CRUD operations in Blazor using SQLite as the database | How to consume REST API in Blazor Application ]