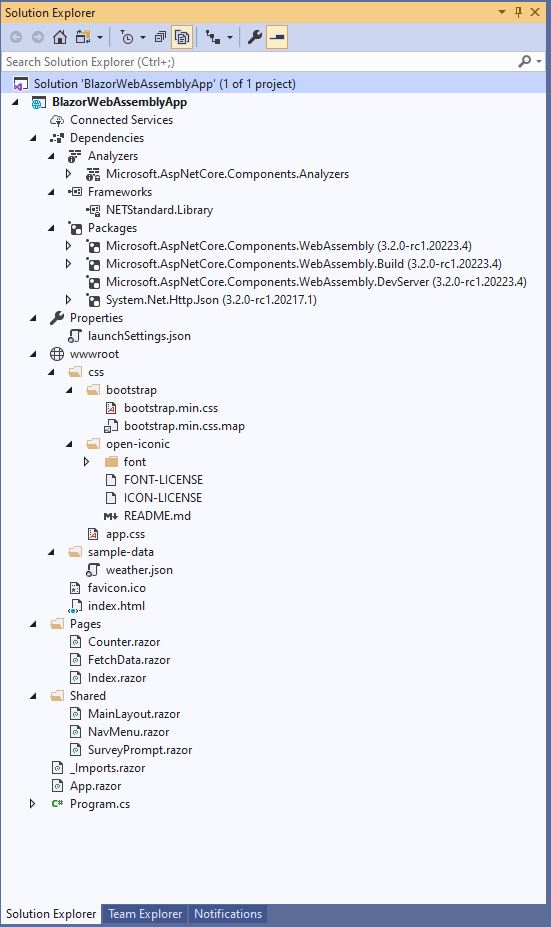
In this blog post, we will take a look into the Blazor WebAssembly App Project Structure and try to understand the folder layout and what the different files represent, and what they do. If you are new to the ASP.NET Core Blazor application, then I would highly recommend you to go through the “Introductory post on Blazor Applications“.
Quick Introduction to Blazor Application
Blazor is a new framework provided by Microsoft to build interactive client-side web applications using C# programming language and Razor syntax on top of the .NET Core framework. The beauty of this framework is that the developer need not know any javascript and can leverage the existing .NET Core frameworks and its associated NuGet packages to power the Blazor application.
The developer can build a Blazor application that can be deployed on the server termed Blazor Server App or can be deployed directly inside the client browsers as a WebAssembly termed as Blazor WebAssembly App. Here, we are going to explore the project structure of the Blazor WebAssembly App.
How to create Blazor WebAssembly App in Visual Studio 2019
The Blazor Application is created using Visual Studio 2019, .NET Core v3.1, and WebAssembly.Templates::3.2.0. At the time of writing Blazor WebAssembly is currently in preview.
Prerequisite
- Visual Studio 2019, free community edition can be downloaded here
- .NET Core 3.1 SDK, download here.
- Download Blazor WebAssembly template using the following dotnet-cli code:
# run the following command in the command line

dotnet new -i Microsoft.AspNetCore.Components.WebAssembly.Templates::3.2.0-rc1.20223.4
Steps to create and display the Blazor WebAssembly application
- Open Visual Studio 2019.
- Select “Create a New Project” from the “Get Started” list on the “Startup Page“
- Select “Blazor App” from the template list and click the “Next” button.
- Give a “Project name“, here I have given “BlazorWebAssemblyApp” as the name and click “Create“. (Let the other options be of default values)
- Now select “Blazor WebAssembly App” from the list of available templates and click “Create” leaving all the other options as it is.
- Select or open the Solution Explorer (Ctrl+Alt+L) to view the Blazor application project structure.
Quick video on how to create the Blazor WebAssembly App in Visual Studio 2019
Blazor WebAssembly App Project Structure – Description
The details of the project structure can be seen in the solution explorer, the explorer displays all the projects related to a single solution. Lets us understand every single item in the project tree list.

Connected Services
This node contains the detail about all the service references added to the project. A new service can be referred here, for example, if you want to add access to Cloud Storage of Azure Storage you can add the service here.
Dependencies
The Dependencies node contains all the references of the NuGet packages used in the project. Here the Frameworks node contains a reference to the NETStandard.Library. The Packages node contains references to the WebAssembly packages the System.Net.Http.Json.
Properties
This properties node contains a launchSettings.json file containing configuration details about what action to perform when the application is executed and contain details like IIS Express settings, application URLs, authentication, SSL port details, etc
wwwroot
This is the webroot folder of the application and all the static files being used in the project are stored and served from here. Images, CSS and javascript files if you need it.
The index.html is the root page of the application, this page specifies where the root app component is rendered and it is also returned whenever any page in the app is initially requested. The index.html page also holds the reference to the _framework/blazor.webassembly.js JavaScript which downloads the .NET runtime, the application, and its dependencies as well as initializes the application to run.
Pages
This folder contains the routable Razor components or pages (views) containing the description of the view and logic to handle user interactions.
Shared
This folder contains Razor components or views that are common across the project.
_Imports.razor
This file contains all the using statements or the Razor directives to include in the components of the application.
App.razor
This is the root component of the application, the routing mechanism of the application can be found in this file. The component receives user requests and renders the matching page on the client’s browser.
Program.cs
This class is the entry point of the web application. It builts the host and configures it. The root component of the application is specified in this class as well as all the service can be registered here.
I hope the article helped you in understanding ASP.NET Core 3.0 Blazor WebAssembly App Project Structure, thanks for visiting. Cheers!!!
[Further Readings: Top 10 Productivity Tips and Tricks in Visual Studio 2019 | CRUD Operations in WPF using EntityFrameworkCore and SQLite | How to implement Dependency Injection in WPF | How to use External Tool in Visual Studio 2019 | Top Features of Visual Studio 2019 Community Edition | Basic CRUD operations in Blazor using SQLite as the database | How to consume REST API in Blazor Application | Blazor Lifecycle Methods | A Simple way to Call Javascript in Blazor Application | Creational Design Patterns | Builder Design Pattern in C# | Prototype Design Pattern in C# | Top 5 Blazor Component Libraries | Abstract Factory Design Pattern in C# | Factory Method Pattern in C# | Singleton Design Pattern in C# | Introduction to Design Patterns | Microsoft C# Version History ]