Visual Studio is one of the best developer friendly Integrated Development Environment (IDE) developed and maintained by Microsoft. The IDE has a huge list of features and in this blog post, we will read about the Visual Studio Output Window.
The IDE can be used to develop a plethora of different applications such as Console Applications, Windows applications (Winforms and WPF), Web applications, Next-generation Internet of Things, Machine Learning applications, and many more. Visual Studio provides an excessive list of debugging features to ease development work.
Visual Studio Output Window usage and description.
The Visual Studio Output Window displays status messages of features like MSBuild, Intellisense, Package Managers, etc, and can be easily configured to display output of an external batch file (.bat) or a COM file. A developer also can display application runtime diagnostic messages to the output window using Debug or Trace class from .NET API. The output window can be open in two ways, first is from the menu bar, select View > Output, or using the shortcut key Ctrl+Alt+O.
Check the quick video on how to open the Output window.
Toolbar Controls in Output Window
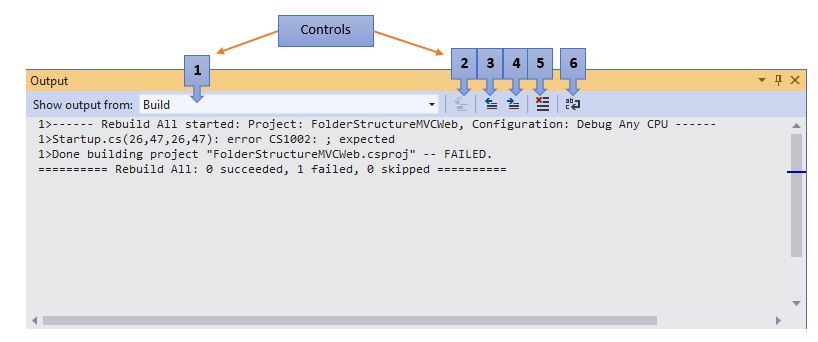
The Visual Studio Output Window provides a toolbar menu with simple control as shown (marked with numbers 1-6) in the image below. The details of each control are the following:

(1) Show output from: The user can select to view the status messages of the feature the visual studio might have used during the selected task. Like for example, the output windows will display the build status messages on selecting build from the show output from options. Here in the above image, “Build” is selected and the status message of the same is displayed.
(2) Find Message in Code: This control is used to navigate to the line of code in the code editor causing the build failure. The user can select the error message and click the menu control to navigate to the code causing the selected error.
(3) Go to Previous Message: The control selects the previous build error status message and navigates to the line of code in the code editor causing the build failure.
(4) Go to Next Message: The control selects the next build error status message and navigates to the line of code in the code editor causing the build failure.
(5) Clear all: The control clears all the output window text.
(6) Toggle Word Wrap: This control on or off the word wrap feature, when the feature is on the longer status messages than the display area are broken down and displayed in the next line.
Configure to automatically show Output Window whenever project build is executed
One of the best features of the output window is that it can be configured to display the MSBuild operation status messages whenever the build is executed. When this feature is enabled the Output Window will be displayed automatically showing the live build messages. The enable this feature user can follow the mentioned steps.
- Press Ctrl+Q (to go to search)
- Type “Show or hide the Output window when the build starts” and selected the first option.
- Select “Show Output window when the build starts” and click ok.
Configure “MSBuild project build output verbosity”
MSBuild feature in Visual Studio is by default configured to display status messages at the minimal level, this level of verbosity is good enough to display project-related build issues but if the user wants to see complete or fewer details about the build issue, he can choose from the five available verbosity level, they are, Quite, Minimal, Normal, Detailed and Diagnostic.
The Visual Studio Community Edition can be downloaded at no cost from Microsoft Site here.
I hope you find this post helpful. Thanks for visiting. Cheers !!!
[Further Readings: Visual Studio 2019 Code Navigation (Ctrl+T) | 10 Basic Machine Learning Terminologies | Introduction to Machine Learning | How to Publish a NET Core application | How to change Visual Studio 2019 Theme | How to create an ASP NET Core MVC Web Application using dotnet-cli | How to create an ASP.NET Core Web Application using dotnet-cli | How to create a dotnet core NUnit Test Project using dotnet-cli | How to create a dotnet core xUnit Test Project using dotnet-cli | How to create a dotnet core MSTest Project using dotnet-cli | How to create dotnet core WinForms Application using dotnet-cli | How to create a dotnet core WPF application using dotnet-cli ]