In this blog, we will talk about Visual Studio 2019 code navigation using the “Go to All” shortcut, which provides a very convenient way to move around in the current and solution files.
Visual Studio 2019 is one of the best developer friendly Integrated Development Environment (IDE) developed and maintained by Microsoft. Visual Studio can be used to develop a plethora of different applications such as Console Applications, Windows applications (Winforms and WPF), Web applications, Next-generation Internet of Things, Machine Learning applications, and many more. Visual Studio provides an excessive list of keyboard shortcuts to ease development work.
Visual Studio 2019 Code Navigation using the “Go to All” (Ctrl+T) shortcut
The Go to All shortcut can be invoked in two ways, The first one is from the Edit menu and the second one is by pressing CTRL+T keys, Go to All search either ways dialog will be displayed. Here in the dialog is where you place your desired keyword.
When the user types in any keyword in the dialog, the dialog displays all the matching objects as a list and the first item in the list is navigated (the cursor is placed at the beginning of the keyword) and the file containing the keyword is opened in preview mode by default.
When the user selects an item from the given list, the visual studio navigates to the selected object. Here the objects can be any class (type), member of any class, any file, or can jump to any particular line in the currently opened file. For example, we type “grid” as the keyword, the search result displays all the objects containing the grid string in its name and the first item in the list is opened.
Go to Dialog – Filter Keywords
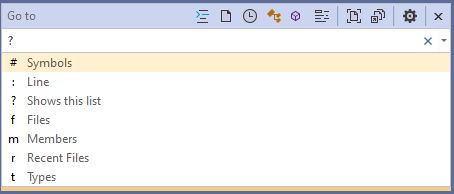
The Go to All dialog provides six keywords to filter the objects the search will be applied to, the list of available filters can be found using the help filter keyword provided by the dialog. To list all the filters type “?” in the dialog box, this will display the help as given below snapshot.

When you want only specific objects to be navigated then you prefix your search keyword with the filter keyword listed as help. Like for example if you want to navigate to files only having controller in their name then you prefix controller search keyword as “f controller” or if you want to navigate to a particular line in the current file then you use “: <line number>“.
The details of each filter keyword as follow:
- # Symbols: If you want to navigate to symbols only then add a # (hash) before the search keyword.
- : Line: If you want to go to any specific line in the current document then add a : (colon) before the line number.
- f Files: If you want to navigate only to files then add f (character) before the search keyword.
- m Members: If you want to navigate to members only them place the m (character) before the search keyword.
Conclusion
Personally, I have been using “Go to All” without any filters as Visual Studio almost accurately finds and navigates the object that I am looking for, provided I have typed the existing object name correctly. This concludes the post about Visual Studio 2019 Code Navigation, I hope you find it helpful, cheers !!!
Download: Visual Studio 2019.
[Further Readings: 10 Basic Machine Learning Terminologies | Introduction to Machine Learning | How to Publish a NET Core application | How to change Visual Studio 2019 Theme | How to create an ASP NET Core MVC Web Application using dotnet-cli | How to create an ASP.NET Core Web Application using dotnet-cli | How to create a dotnet core NUnit Test Project using dotnet-cli | How to create a dotnet core xUnit Test Project using dotnet-cli | How to create a dotnet core MSTest Project using dotnet-cli | How to create dotnet core WinForms Application using dotnet-cli | How to create a dotnet core WPF application using dotnet-cli | How to create a dotnet core console app using dotnet-cli ]